Sunday, December 30, 2012

Have A Happy, Glittery New Year...And Dodge A Hangover

Holy crap it's December 30th!  Wherever 2012 went...it can stay there.  Harrumph.  Tomorrow night's the glittery-est, most jubilant holiday in the US, New Year's Eve.  Today's post might seem a little odd, but I realized that almost every NYE I've ever celebrated as an adult has been dimly lit.  Bars, parties, etc...it's always a bit dark.  A lot of polish loses its beauty in low light...but not all of it.  As an overnight security guard and nail polish fiend, I've spent more time than most looking at polish in dark hallways.  I know how that sparkle holds up.

I've also tacked on some drinking and makeup tips after the polish.  When I mention to people that I've only had one hangover, people ask...practically demand...to know how.  You'll find my hangover avoidance tips down past the polish.


...but first the polish.  Nichole's not alone in her gradient obsession.  Black and silver seems to be 'the' NYE color combo, so I did a gradient with Sinful Colors Heavy Metal and Finger Paints Black Expressionism.


I'm not doing anything to celebrate NYE this year, but if I was this would be my mani for the night.  It was exactly what I wanted it to be and the gradient effect made the silver almost vanish at some angles.


I can't completely vouch for how this would look in low lighting, because it was really bright here when I did it...figures, doesn't it?  It held up really well in lower-than-a-lamp light though.


It never looked completely black.


I used Heavy Metal for that gradient because foils, especially silver ones, keep a lot of their sparkle in darker settings.  I used its near-dupe, Nicole by OPI Give Me The 1st Dance for my Rocky Horror night nails for that exact reason.


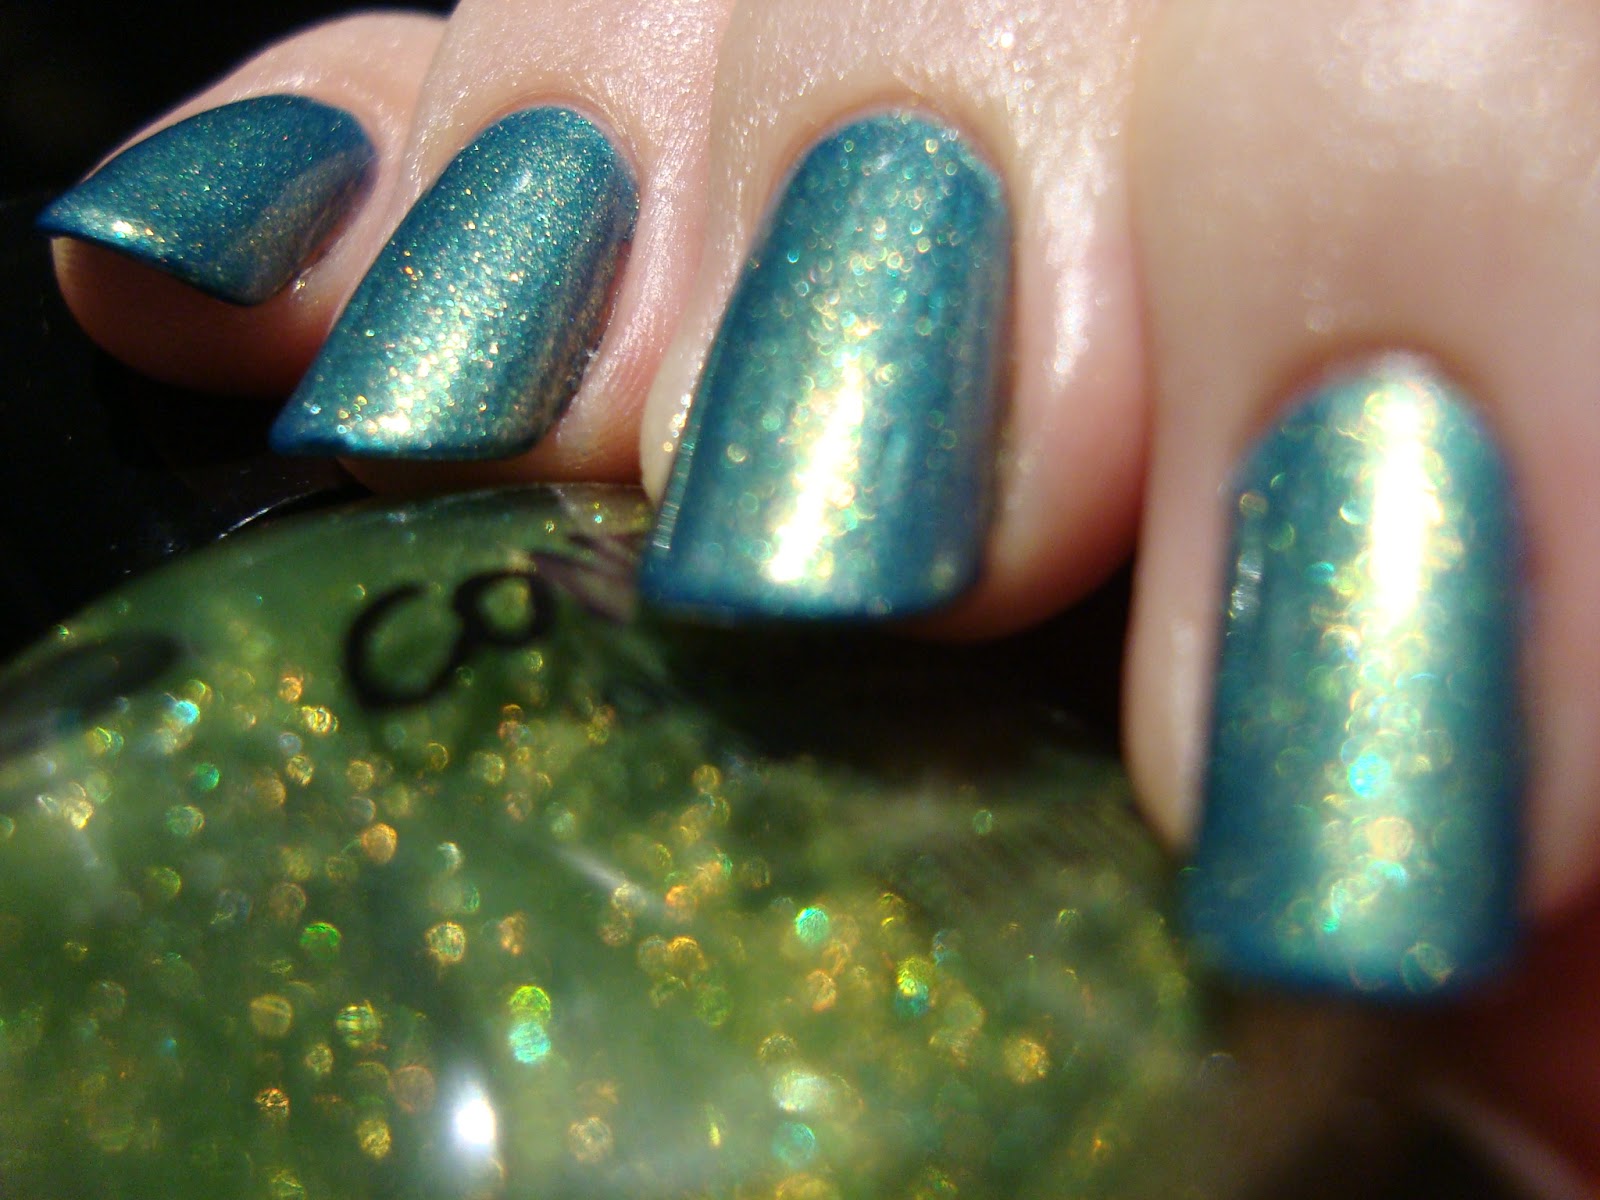
As perfect as holographic polish might seem for such a sparkling holiday, most linear holos look dull and flat in anything but sunlight.  Scattered holos don't do much better (Zoya Aurora, for example).  Holo glitter has all of the rainbow sparkle you could want in bright light...

Finger Paints Sparkle And Snowflake over Black Expressionism

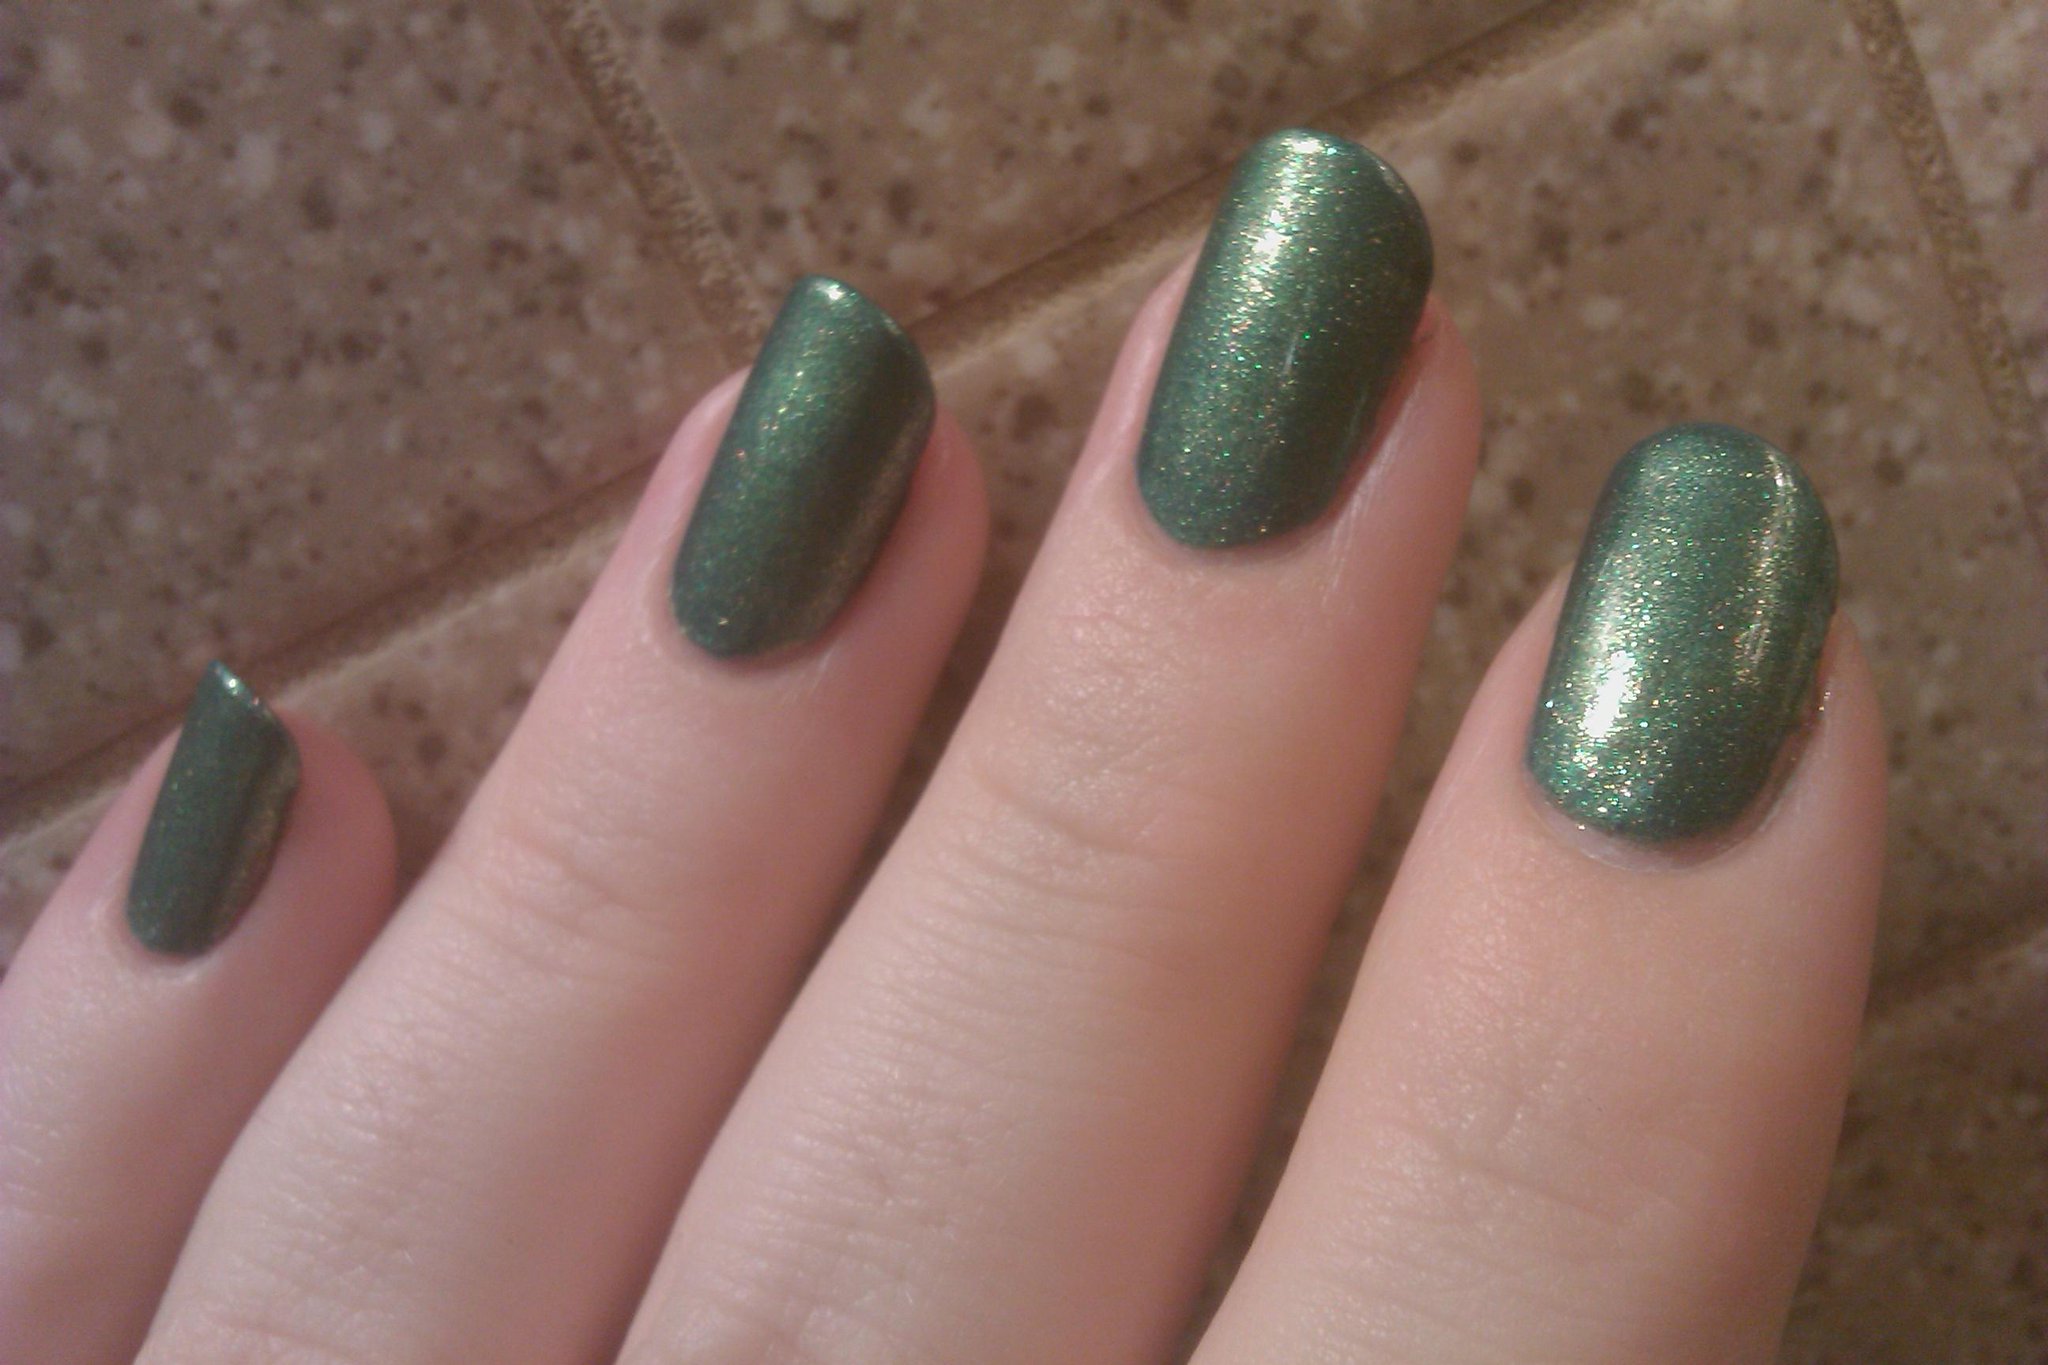
...and keeps that look surprisingly well in low light.

Finger Paints Sparkle And Snowflake over Black Expressionism - low light

Foils and holo glitter (over something dark) are my top suggestions, but lots of other things show up well in low light too.  Bright jellies become dark and vibrant.  Plenty of glitters and shimmers still sparkle in any light they catch.  Iridescent glitters and flakies mattified over dark colors still pop.

Revlon Heavenly (review coming soon!), mattified, over Royal

Glitters and flakes can also look really cool in colored light.  NYX Beige Glitter over Illamasqua Prosperity did the craziest thing when I was plugging my phone's car charger in one night.


I could see that looking amazing in a bar or club!


I was going to post some makeup pics, but I haven't slept much and I'm all puffy...so...not gonna happen.  A few suggestions is all you're getting. :p  The last three times I went out for NYE, someone knocked me to the floor.  Three different people, places, and situations...but shit can get a bit crazy on that night more than any other (except maybe Halloween).  I go with makeup that will look about the same if I get plastered, forget I'm wearing it, and rub my face.  No blush...not that I really wear it anyway.  Water-resistant, pre-smudged smokey eye makeup looks about the same in the morning when you forget and wear it to bed.  Lip gloss will give up quickly, without leaving odd remnants.  A stain under it will leave you with some color, even if you're having too much fun to remember to touch up the gloss.

If you're going to be outside watching a ball drop, a bonfire, or whatever, and you'll be out in the cold there are a few more things to consider.  If you're like most people, your nose will run.  Tinted moisturizer (without powder) will protect your skin a bit, but won't leave you looking weird if you blow your nose.  Your lips will probably chap, so stain is a good bet here too...you can keep slathering your balm on, but still have color.  A tinted balm or moisturizing lipstick is great too.


...and what some of you are really here for...

Having a method for hangover avoidance makes me seem like more of a drinker than I am.  Well...than I am now.  It's really my own tweaks on time-tested fratboy and barfly advice learned from exes and friends who taught me how to drink.  That hangover I did get that one time was caused by completely flouting this advice.  I finished a drink (mixed by someone else and stronger than I thought), and then went right to bed without a glass of water or anything.  I skipped breakfast the next morning.  By 6pm at work the next day, I was dry-heaving and my head was swimming.  Really miserable day.  Never again!  I follow these steps any time I have more than two drinks:

Have this stuff ready before you go out (or start, if you're at home):
  • two 32oz bottles of low-sugar sports drink (like Gatorade G2) in a citrus flavor (bring one with you if you can, and have the other wherever you'll be when you wake up)
  • naproxin sodium (Aleve) NOT ibuprofen, acetaminophen, or aspirin
  • a bland, salty, starchy snack (popcorn, corn chips, pretzels, unflavored baked chips, etc - nothing super greasy)
  • 2 liter bottle of caffeinated diet soda (or some coffee if you prefer)
Keep in mind that heavy drinking is harmful.  It's fun (and I kinda miss it sometimes)...but it's bad for you and you shouldn't pretend it isn't.  Hangovers come largely from dehydration, but that's the part you can fight.

One of the biggest pieces of advice is also the gross one.  If you feel like you need to throw up...do it.  There's no shame in it (if you don't make a mess).  Your body is responding to the stress of the alcohol by purging it and you'll only be stressing it out even more if you hold it in.  It feels awful while it's happening, but you're doing your body a big favor and you'll generally feel better pretty quickly.

Once you've stopped drinking (and PLEASE don't drive or let someone who's been drinking drive, but you know that), start in on the sports drink.  This is the most important part, especially if you puked.  Even if you didn't, you're dehydrated and you probably don't realize it.  If you couldn't bring one with you, buy one.  I recommend the low-sugar because sugar can upset your stomach.  Citrus flavor seems to be the easiest for me to handle if I'm feeling rough.  Finish the whole bottle of sports drink before going to sleep.

Go out to breakfast on the way home or eat something breakfasty before bed if you're even a little hungry.  Keep it mild and starchy.  Potatoes are ideal.  If you can't get breakfast, have fries.  The carbs do wonders in speeding recovery.  Don't eat anything spicy or weird when you're drunk.  That never ends well.  If you can go to bed sober and well hydrated, even if it's at 8am, you're golden and will probably feel completely fine when you wake up.

If you do go to bed drunk, but hydrated, you might need some more help.  When you wake up, despite avoiding a hangover, you might feel kinda sluggish and have a bit of a headache.  This is where the rest of the supplies come in.  One naproxin (with food) should be enough for the headache.  Take two if you have to, but keep in mind that you walloped your liver last night and it has to deal with painkillers too.  This is why you shouldn't take acetaminophen/Tylenol after drinking.  It's more stressful to the liver.  I recommend naproxin over aspirin or ibuprofen because they're rougher on the stomach.  If your stomach feels a little wobbly (throwing up can leave you feeling a bit hollow), eat the chips (or whatever).  These are especially handy if you're still tired from a long night out.  No cooking, just open the bag and munch.  The salt and carbs will help pick you up.  The last little boost you might need comes from the soda or coffee.  The caffeine should take care of the sluggishness.  The second bottle of sports drink should be finished within a few hours of waking up, even if you've also had soda or coffee.

I can't guarantee you'll feel 100% if you got trashed the night before, but these steps have always gotten me back to at least 85%.  My only hangover left me feeling about 20%.  Never. Ever. Again.


If you're going out for NYE have fun, stay safe, and drink one for me....I'll be at work.

Nichole and I have some big ideas for the next few months and I need to thank all of you for making this blog one of the good parts of an otherwise pretty shitty 2012.  Here's hoping next year is great for us all!  See you in '13!

Thursday, December 27, 2012

My xmas and a fail nail

My original idea was to swatch a bunch of xmas polish in November, then do mostly nail art in December.  You saw how that worked out.  A couple of days before xmas, I finally got around to trying an idea I'd had. I loved the result...kinda.

Sinful Colors San Francisco * Sinful Colors Hot Hot Heat * Wet n Wild Deadly Dose

I say "kinda" because it bubbled.  Hard.

*sigh*

Can you smell the sadness and regret?  I wanted to do it again, and sponge the gold on, but I didn't have time.  Oh well...next year, maybe.

And then suddenly xmas was upon me.  We started celebrating on the 23rd, and I had four xmases in three days!  My decorations and giftwrap are...different.


I've found some really great holographic paper and ribbon the past few years, and I love the black and silver stripe too!


My roommate and partner are just too damn cute!


My partner gave me Deborah Lippmann Cleopatra In New York (I didn't hint, I instructed...complete with $10 off HSN code) and both halves of Venture Bros season 4 on DVD!  Just what I wanted!

I did my xmas mani on the 24th, OPI Smitten With Mittens!  One of my best finds in a year of amazing finds.


That photo doesn't even begin to show how beautiful it is.  It's alive with shimmer, really stunning!  The best part?  It lasted really well until this morning when I did some swatching for future posts.

My xmas was great!  I got to spend time with my family and two of my favorite kitties.

Neko, happy and warm on the radiator and doing so much better!

Cobweb, and our vaguely white xmas

Ma gave me my own copy of a favorite cookbook and a hand mixer!  Now I can stop borrowing hers all of the time!  My sister made us this amazing Krampus plush.


The naughty little children in the basket on his back are....us!!  She did a great job on my roommate especially.


We went and saw my partner's family too for a bit.  It's always nice to see them, and they gave me an Ulta gift card!  Yay!


Hope everyone had a great holiday season!  2013 is almost here already!!  Check back soon for festive nail ideas and hangover prevention tips.

Monday, December 24, 2012

My Picks from Confetti Sparkle & Shine

This is it, the last set of holiday collection swatches!

I was wandering my local CVS one morning when I saw this cute little holiday display of Confetti polishes.  The names suggest both xmas and New Year's Eve.  If you're not familiar with the Confetti brand, they're exclusive to CVS and are a sister brand to 10 Professional.  I'm not too familiar with the brand yet, but they're only $2 each and I had a CVS Beauty Club coupon that was about to expire, so five of the eight new shades came home with me.


Five Golden Rings is a bright yellow-gold shimmer.


This looks much more yellow on me than it does in the bottle.  You can even tell that a bit in the photo.  The formula was about what you'd expect from borderline-metallic shimmers...in other words, it bubbled a bit.  Not terribly, not unwearably.  If you coaxed it, you could probably apply it without bubbling.  Sponging would also probably work.


I'm Gonna Party All Night Long is small red and gold hexagonal glitter and red microglitter in a clear base.

over Five Golden Rings

This was one coat.  It applied well, and didn't require the extensive dabbing and placing that a lot of glitters do. The microglitter really adds something.  So many bargain glitter polishes are all one size or one color and I really like seeing Confetti mix it up a little like this.  The only downside is a very strong smell, but it fades a lot as the polish dries.  I really like the combo with Five Golden Rings too!


Under The Mistletoe is medium blue packed with an almost-iridescent gold shimmer.


I hate to say it, but this formula on this was bad.  It reminds me of what a lot of polishes I used as a kid were like.  It looks ok-ish up there, but I was being sneaky.  It did this odd 'trenching' thing that's never made any sense to me.

second coat didn't drag, but seemed to pull at first coat as it dried

But it's such a beautiful shade that I had to just HAD TO make it work!  Sponge, then a thick coat of mattifying top coat for smoothing.


And then back to gloss...I really love it like this and I think it was worth the effort.


Time 2B Dazzling is an incredible green-gold shimmer in a clear green base.

over black

It's way too sheer to wear on its own, but it's AMAZING for layering.  It applies evenly in two coats, without dragging or other problems.  It took the beauty of Under The Mistletoe and added extra depth.  They go so well together!


It really varied with the lighting too.  This combo was a starer!


When it's over black it's got a whole other side to it and so much personality!


There's a high-end polish this reminds me of, but I can't remember which.  It looks great mattified too.


Better Late Than Never is a dense dark pink shimmer in a sheer pink base.

over black

This is one of those that looks awesome in person, but not nearly as good in photos.  I tried, I really did.  The application (sponged or brushed) was slightly patchy, no matter what I tried.  It was barely noticeable in person, but glaring in photos.  Still, I love the shimmer and I bought some extras for frankening.


The final score is one superstar, two winners, two not-quite winners.  If you find a bottle of Time 2B Dazzling and you like layering, BUY IT!!  I got a back-up bottle and another for frankening...that shimmer is just so terrific and for $2 (maybe less if you find it after xmas), it's even better!  Five Golden Rings isn't great with my skin tone (and I'm not big on yellow), but it is really nice as a base for I'm Gonna Party All Night Long and I'd recommend both...especially together!  I can't call Better Late Than Never or Under The Mistletoe losers, because I do really like both of them...but with some caveats.  Neither has a very good formula, but they sparkle beautifully and with a little work they have a TON of potential.


And now it's xmas eve!  I never expected to cut it this close, but I made it!  So many gorgeous polishes this season!

I'm off to Ma's house to have dinner with my partner, our roommate, Ma, her boyfriend, and my sister (and Ma's cats - Neko is doing really well!).  I hope you have a great time doing whatever it is you're doing and I'll be back in a day or two when all the festive fuss has died down.  Merry xmas!

I Do Not Enjoy Subtlety


I bought a dress from Forever 21 last month that I had to return. (It had a tear in the collar. I was sad.) They do not give you your money back there, only store credit. So now I have $30 worth of credit to a store that carries very little that I am interested in wearing. But...they do have nail polish! So I picked up 3 bottles (all shall be shown in a later post.) They have the most unoriginal names ever, by the way. But the colors are nice, the formulas are decent, and for $2.80 I am not complaining. 

One of the colors I picked up was inauspiciously named "blue-green". It's a beautiful, shimmery duochrome that shifts from blue to green to purpley-pink. It's brilliant and reminds me of mermaids. It is SUPER thin, however. I am betting it will take me five coats to approach what it looks like in the bottle. It's definitely one for layering. I thought it might look kinda neat water-marbled over navy. And it does. But oh-my-god subtle! In reality, the shiftiness was obvious and neat. My camera refused to catch any of it. It just looks blue. 

Colors Used
Sally Hansen Navy Baby
Love & Beauty Blue-Green


Sunday, December 23, 2012

Finger Paints Sparkle And Snowflake and Merry Mistletoe

I'll admit it, I bought these two new Finger Paints holiday polishes to compare them to other new holiday polishes.  I'm happy I did, since they're not dupes for their comparison partners.  I bought Sparkle And Snowflake to see how it matched up to China Glaze Glistening Snow, since they look *very* similar in the bottles.  I had a hunch that Sparkle And Snowflake wasn't full-coverage...but you'll see if I was right.  I got Merry Mistletoe to compare it to Zoya Logan...and I was so completely wrong that I didn't even bother doing comparison swatches!


Sparkle And Snowflake is dense silver holographic microglitter in a clear base.

over black

Over black this just blows me away!  If you liked the idea of Zoya Storm, but wanted way more OOMPH (and don't mind substituting glitter for holographic particles), this combination is ideal.  This is just one coat!  It's that intense.  It applies pretty evenly, with moderate need for dabbing thin spots.  The formula is a bit thick, like many Finger Paints glitters.  It dries slightly gritty, but only needs one extra coat of top coat.


Merry Mistletoe is a clear green base packed with gold microfleck shimmer.

over Finger Paints Tough Art To Follow

Wow was I wrong thinking that Merry Mistletoe is anything like Zoya Logan!  I knew it would be on the sheer side, but you could never get it to build to full opacity.  It's still completely sheer at three coats.  It layers wonderfully though.  Over Tough Art To Follow, it reminded me of an xmas tree, so I added 'lights' with a coat of Sparkle And Snowflake.


Seeing the bottles side-by-side, I think you can at least get my line of thinking.

Sparkle And Snowflake * Glistening Snow * Logan * Merry Mistletoe

There really was no reason to compare Merry Mistletoe and Zoya Logan, but I did compare Sparkle And Snowflake and China Glaze Glistening Snow.

I- 3 coats Sparkle And Snowflake * M- 3 coats Glistening Snow
R- 
1 coat Glistening Snow over black * P- 1 coat Sparkle And Snowflake over black

I'm sorry for the weird order, but I still have some awful stains on my middle nail from the hungry guy.  I didn't want the sheer base of  Sparkle And Snowflake to look slightly green.  As you can see, they're far from dupes.  Sparkle and Snowflake doesn't build to full-coverage like Glistening Snow does, but that means it layers really nicely.


If you see Sparkle And Snowflake and Merry Mistletoe in Sally Beauty's after xmas sale, I'd grab them.  Both have tons of layering potential.


Just one more xmas collection post left...and just in time too!

Friday, December 21, 2012

Remembering A Friend

I hope this is the saddest post I'll ever write.  Two years ago today, my friend Bill Savage died in a car accident.  I've known for months, since around the time we started this blog, how I'd commemorate this day.


I bought Sinful Colors Savage thinking of him and I haven't worn it until today.  It reminds me of him every time I see it.

The Kool-Aid Man was an inside joke.  It was gonna say "Hey Willis" on the middle finger and "Bush Lied" on the ring...but I'm not good enough with my nail art brushes yet.  No one else in the world knows why, now that he's dead.  It makes me laugh, thinking about the source of the joke, but hurts too.

Savage was only 26, his widow had just turned 22.  It was four days before xmas.  The whole story is too sad to tell, as if that wasn't enough.  I've lost touch with her, but I hope she's coping as best she can and that her xmas is the best it can be...that her life after Savage is the best it can be.

I'm sorry for such a downer post this close to xmas.  I miss you, Savage!

How To: Sponge Gradient

I hope you are all enjoying the apocolypse. Remeber kids, zombies were people too.

I recently posted about my obsession with gradient manicures. I had a few requests for a video tutorial (which I still might do once the holidays are over). I need an assistant to do a video tutorial, so I decided to do a photo tutorial instead. It seems like this is a pretty tricky manicure to master for some people. There are tons of how-to's out there, all seemingly different and "super simple!" This really is a simple manicure once you get the hang of it, it's just a matter of practice.

Some tips I've learned:

  • The sponge doesn't have to be wet. Some tutorials I've read say otherwise, but in my experience it doesn't make a whole lot of difference. Sometimes I wet the sponge, sometimes I don't. It's up to you.
  • Polishes with similar finishes work the best. Pearly with pearly, cream with cream, etc. My favorite is pearly/metallics because they really are the most forgiving. The sparkle will cover any spots that didn't blend well.
  • When in doubt, add glitter! Glitter really does make everything better, I promise. My very first gradient was much improved by a healthy coat of China Glaze Fairy Dust.
  • Add your topcoat when you are done with the whole hand. It really will help hide the weirdness left over from the sponging. 


So this is what I'm going for. A shimmery, sparkly gradient that is fairly well blended together. This would have been a 20 minute manicure if I hadn't taken so many pictures.


Gather your supplies: two bottles of nail polish, a few sponges, and a piece of foil/paper plate/junk mail. We'll need it for blotting, so anything that won't soak up the polish will work.

Pictured above: Fingerpaints Studio Ruby-o and Sally Hansen Gilty Pleasure.

Paint your basecoat, your polish, and top coat. I used two coats, but you use however many you need to get your basecoat opaque. Or not, depending on what your desired result is. The topcoat is important here. If you make a mistake with the gradient, the topcoat allows us to remove the second color without having to redo the base color.

Basecoat, two coats of Gilty Pleasure, and a nice coat of Insta-dri.

Once your base is COMPLETELY dry, get your sponge handy. Paint two stripes of polish on the end of the sponge. Whichever color you want at the tips goes furthest from the edge. 

I wanted pink tips, so the base color goes near the edge and the tip color goes furthest

Blot it a few times on your foil. 


Then press it gently onto your nail. It should look something like this, only possibly less pigmented. (I forgot to blot!)
no blotting yet. This might be an overly-complicated way to do tips...

Keep blotting, moving the sponge each time you make contact. Think of it like "a step forward, a step back". The idea is to blend the colors as best we can. If you don't feel there is enough color, you can always add some more. The beauty of this particular manicure is that it is super forgiving.

blotted, but no topcoat. It looks a little rough, but that is mostly because I forgot to blot.

This is what your sponge will probably look like after the first nail. The colors do get a bit muddy, but it shouldn't be a big deal. I use the same side of the sponge for my whole hand. I think that the last finger always looks better than the first.  


Continue on to the whole hand. By the pinky finger, you'll probably have a decent idea of what you are doing. It's not really rocket surgery, it's just practice. Once you are done, go ahead and apply your topcoat. It should help blend the colors a little more smoothly.

If your topcoat drags...

Don't worry. No big deal. If you applied a topcoat to your base color, you should be able to take an acetone saturated cotton ball and gently wipe off the color.

oops. Damned topcoats.
See? Good as new. 


And then just re-do the gradient. I think this is my favorite nail art because while it looks really complicated and awesome, it is dead-easy to do in a short amount of time. Plus, mistakes are so easily corrected. Not like when you spend all day making dots/stripes...and the topcoat drags! 

all fixed!

 Final result (again). I mentioned earlier that I forgot to blot on the first finger (my index). You can kind-of tell that the colors aren't as blended on that finger as they are on the following ones. It's really up to you if you want to blot. I think it looks better, but you may not.


Thursday, December 20, 2012

Pinspiration: Marchesa Gown

I spend a lot of time on Pinterest. I mean A LOT. I love it. It's a neat way to bookmark things that I want to revisit eventually. I have found a ridiculous amount of recipes, craft projects, home decor crap, and nail art on there. Most recently, I have been looking for inspiration for nail art. I'm trying to go outside my comfort zone when it comes to my nails, though doing so in baby-steps. I recently saw this beautiful Marchesa dress ( I kinda love Marchesa because I LOVE Georgina Chapman on Project Runway Allstars!) and I knew I had to recreate it. It looked fairly straight forward, just a plain old glitter gradient over navy. I decided to add a little taping action to give it a little something extra. I wanted to suggest the shape of the dress. I'm still not sure about how I feel about the taping. In fact, I actually only did one hand with the tape. I think I prefer it without the tape.

My inspiration picture:
source
Colors Used:
Zoya Luna
Sally Hansen Navy Baby


the elusive right hand! Poor thing never gets featured.


Oh, and Happy End-of-theWorld. I hope your nails are done.